One of the most popular techniques to procure synapse-resolution datasets relies on combining imaging technology that is a few decades old, serial-section electron microscopy (EM), with cutting edge artificial intelligence. Here’s how the process works.
We start with a piece of brain that’s been removed from an animal. No microscope exists that can image a live brain at anywhere close to the resolution of EM, and if we want to see and chart the sizes of every synapse, EM is necessary. Most modern EM research projects pair activity with connectivity measured from the cells that are later imaged. This yields rich functional maps of neurons and their synapses, allowing teams to decipher computational circuits. This field is called Connectomics
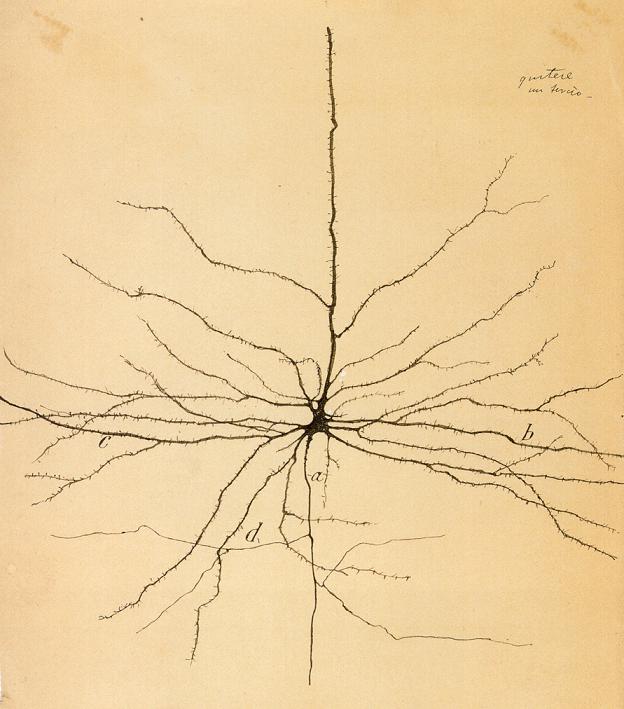
Since neurons are naturally clear, if we want to see them underneath a microscope, we first need to add a stain. Staining has a special place in the history of neuroscience. Camillo Golgi was the first person to reveal neurons by staining brain tissue using silver in the 1870s. His Golgi Stain innovation later allowed Spanish neuroanatomist Cajal to see and draw the intricate structures of neurons, introduce the idea of the “neuron,” and be known over a hundred years later as the father of modern neuroscience. Imagine what he would think if he could see neurons at EM resolution, 100,000 times closer than the microscopes of his day! We like to think Cajal would find these neurons as beautiful as we do. But before we can see them, there is still much work to do.
Staining is an art form. The stain is based on a heavy metal, like osmium. The heavy metal gets absorbed by the fatty cell membranes of neurons. Heavy metal accumulation means that electrons will be reflected when the tissue is imaged later, and the membranes will show up darker. Trying to make sure that every membrane evenly absorbs the stain is tricky. Researchers have been making good progress in reducing staining errors so they can stain larger and larger volumes.
After staining, we embed that piece of brain in a resin to make it hard (like the Human Body exhibit). Embedding is also an art form. If it’s not done correctly, membranes can burst, only to be revealed after imaging when it is impossible to figure out where the tiny branches meander. Why do we need to make a hard cube of brain?
The next step requires use an extremely sharp knife made of diamond to cut that block of brain into nano-thin slices. Since brains are squishy, you can only section them if they are encased in a sturdy structure. There are different types of brain slicers, known as microtomes. Some use super-expensive diamond blades, like a ultra-high-tech deli slicer. Others use ion beams that vaporize the top layer of a block. The better your process, the thinner your layers, but there are trade-offs with how much material you can cut, how much you distort the material, and how fast you can collect data.
Each slice is collected on a conveyor belt of tape, then reeled through an electron microscope that takes a nanometer-resolution image of it. There are different types of electron microscopes. Some take images by projecting electrons through the slices, and others capture electrons that bounce back from the slice. Both have advantages and disadvantages in the speed or imaging and the quality of the images.
Cutting a slice and then imaging it isn’t the only way to go. Some labs image the face of the tissue block, then shave off a layer and image the newly exposed face of the block. Again, there are trade-offs with speed and quality. It all depends on the type of question a researcher is trying to ask.
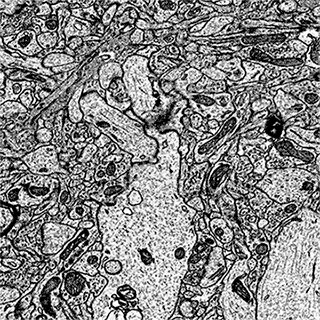
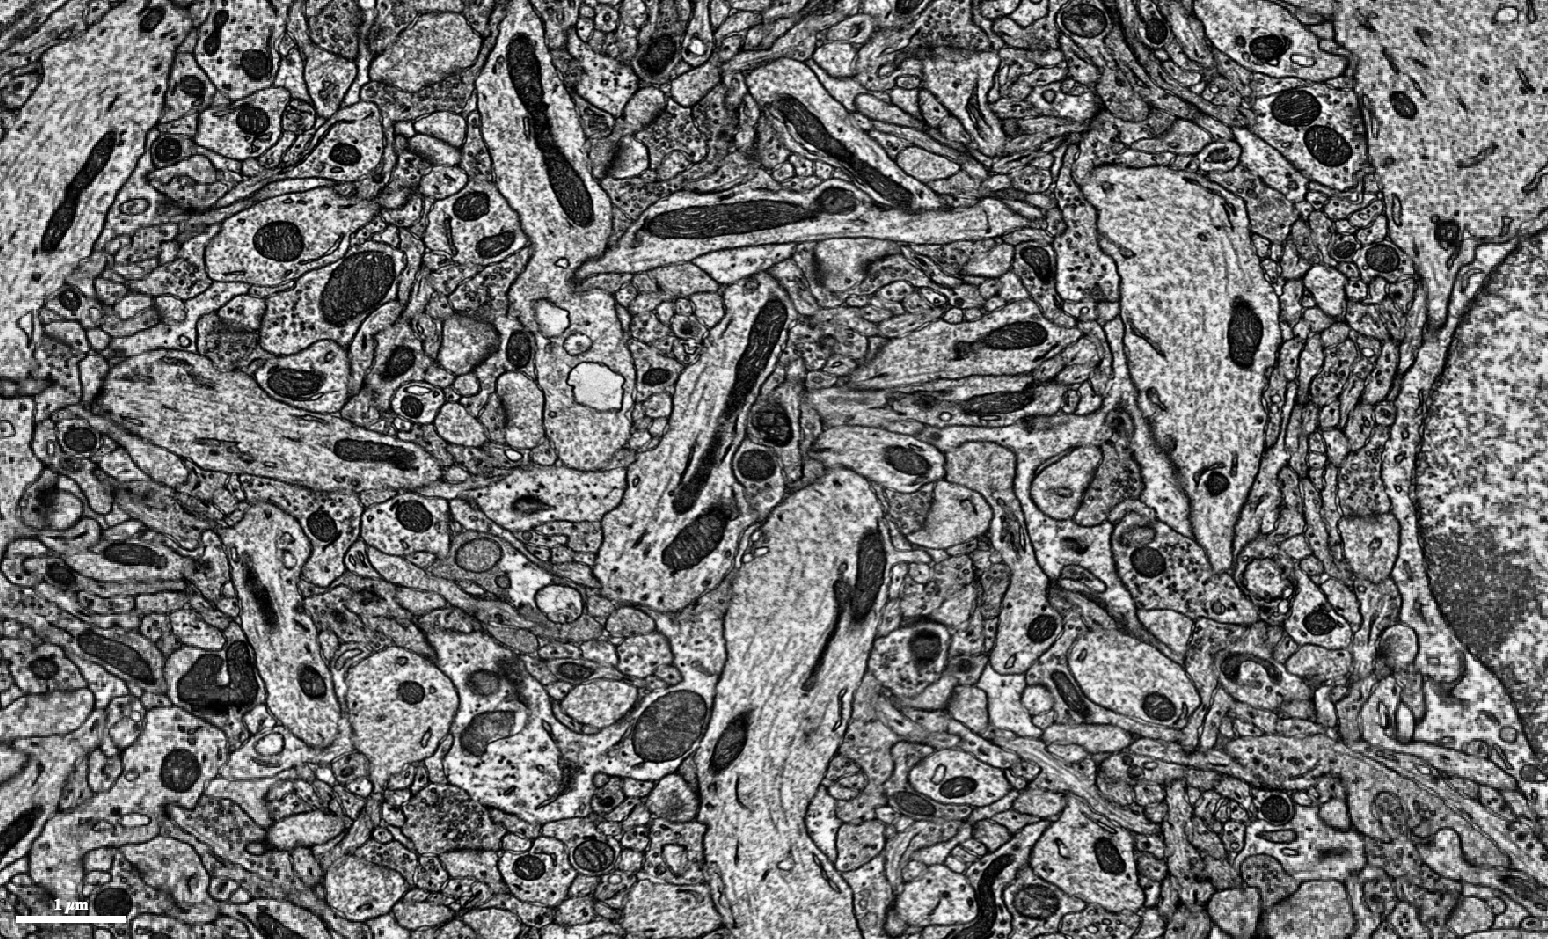
The more stain, the more electrons bounce off the darkened membranes, the clearer we can see the cells. In the resulting black and white images, the cell walls of each neuron, which wrap around them like bark on a tree, show up as dark rings encasing oval branch cross-sections.
EM Fun Facts:
The slices are only 40 nm thick and are easily deformed by the cutting and imaging process, so we try and correct for that deformation by warping the images to the point that objects in the image flow smoothly between slices. Slice by slice, image by image. Now we’ve got a stack of images that represent the entire volume of brain. You can scroll through it like a movie.
Now we’re finally ready to trace neurons! In the past, humans would trace out the path of each neuron in each slice, and they’d mark where two neurons connected to one another. Decades ago, humans did this by hand. More recently, they’ve used computer software to help.
But even with software, it’s incredibly laborious. It can take years to trace out fractions of just a couple hundred neurons. The neural circuits that scientists want to investigate are composed of hundreds of thousands of neurons, so we need to find a faster way.
We use a “convolutional neural network” to mark whether each pixel in each image is the boundary of a neuron or not.
A convolutional neural network is a state-of-the-art artificial intelligence method that’s based on how simple models of neurons learn to recognize objects. That’s right -- we’re using simple models of the brain to help map the brain. Hopefully we’ll use those maps to make more accurate models of the brain to complete the virtuous cycle.
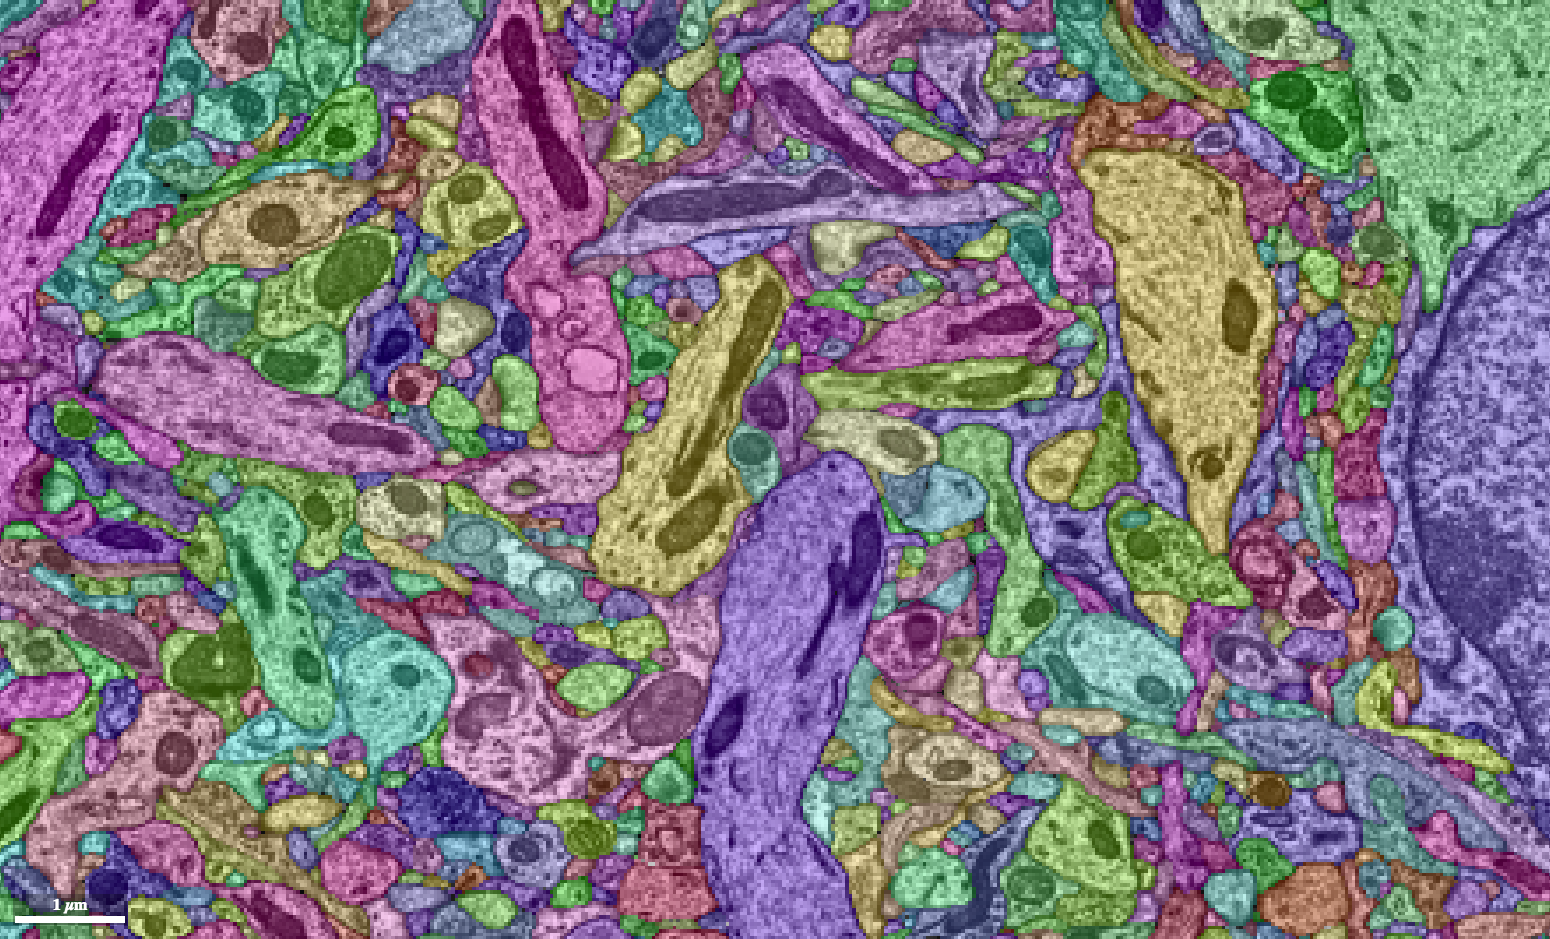
We use an algorithm to color in between the neuron outlines we’ve made. Because the outlines aren’t always correct, we color in the small chunks we can be certain about. The result looks like if we completely colored in all the neurons, then shattered them into a bunch of tiny fragments.
If our automatically generated boundaries were totally correct, this would be enough to solve the problem. Unfortunately, we’re not there yet. With the neuron fragments, we use a series of different artificial intelligence methods to determine which fragments go together.
Then we bring in humans to help evaluate and correct the AI to produce perfect neurons!
In EyeWire, we used AI to build neuron fragments known as “segmentations,” the basis for puzzle pieces that gamers fit together to reconstruct cells. Eyewire does not use AI on top of AI to put neuron fragments together -- humans did that.
In Mystic, the newest dataset added to Eyewire, the AI uses a mean spanning tree. In addition to segmentation, this second AI has looked at neighboring fragments and scored how likely the two fragments are to belong to the same neuron. If the score is high, the fragments are assigned to the same neuron. We let the players control this assignment process so they can quickly correct it if the AI was incorrect.
For new datasets, the AI will be based on a convolutional neural network that assigns the score between fragments, resulting in mostly automated mapping. Human intelligence comes in to correct the AI and help it learn.
While we reconstruct the neurons, we also need to identify their connections, where two cells form a synapse. If the tissue is stained and imaged properly, synapses can be visible as a really dark smudge between two neurons neighbored by a set of cellular vesicles transporting neurotransmitter.
We’re talking about chemical synapses where neurotransmitters are released from one neuron to send a signal to a neighboring neuron. There are also electrical synapses, where the electrical signal in one neuron is directly passed to a neighboring neuron through a trans-membrane ion gate that spans across the two cells’ synapse. But electrical synapses are extremely small and nearly impossible to see even with electron microscopes. Most questions scientists are trying to ask can all be answered with chemical synapses.
We use another convolutional neural network to look through all of the images and label those dark smudges as synapses. Then we combine those smudges with our reconstructed neurons to say the one neuron sends a signal to another neuron at a particular location. By counting the number of pixels in the dark smudge, we can estimate the size of the synapse, too.
And that’s it! With the reconstructed neurons and the synapses, we have a connectome! Well, at least a part of one. Connectomics researchers have started small and are working their way up to ever larger datasets. Already there have been exciting discoveries revealing uncharted circuits and inviting many new questions.
Using electron microscopy isn’t the only solution to mapping all the connections. Light microscopes allow some imaging of active synapses, but there is currently no way to see all synapses or measure how they vary in size. There is a new technique under development that involves assigning each neuron with a unique genetic tag, like a barcode. Researchers can then inject a protein to the tissue so that when two neurons synapse, the protein ties the two genetic tags together. The whole tissue can be dissolved, leaving only the genetic material. When that genetic material is sequenced, the tied together genetic tags can be recovered and all of the tags together represent the connectome! Right now, there’s no easy way to recover the shape of the neurons or assign a location in space to each connection, but researchers are making great progress to figure out how to do that.
The structure that allows one neuron to send a signal to another is called a synapse.
The stereotypical synapse follows this sort of pattern:
To see these circuits in action, check out this Crash Course
Neurons are impressive objects because of the multiple levels of scale that they occupy. Let’s put this in perspective:
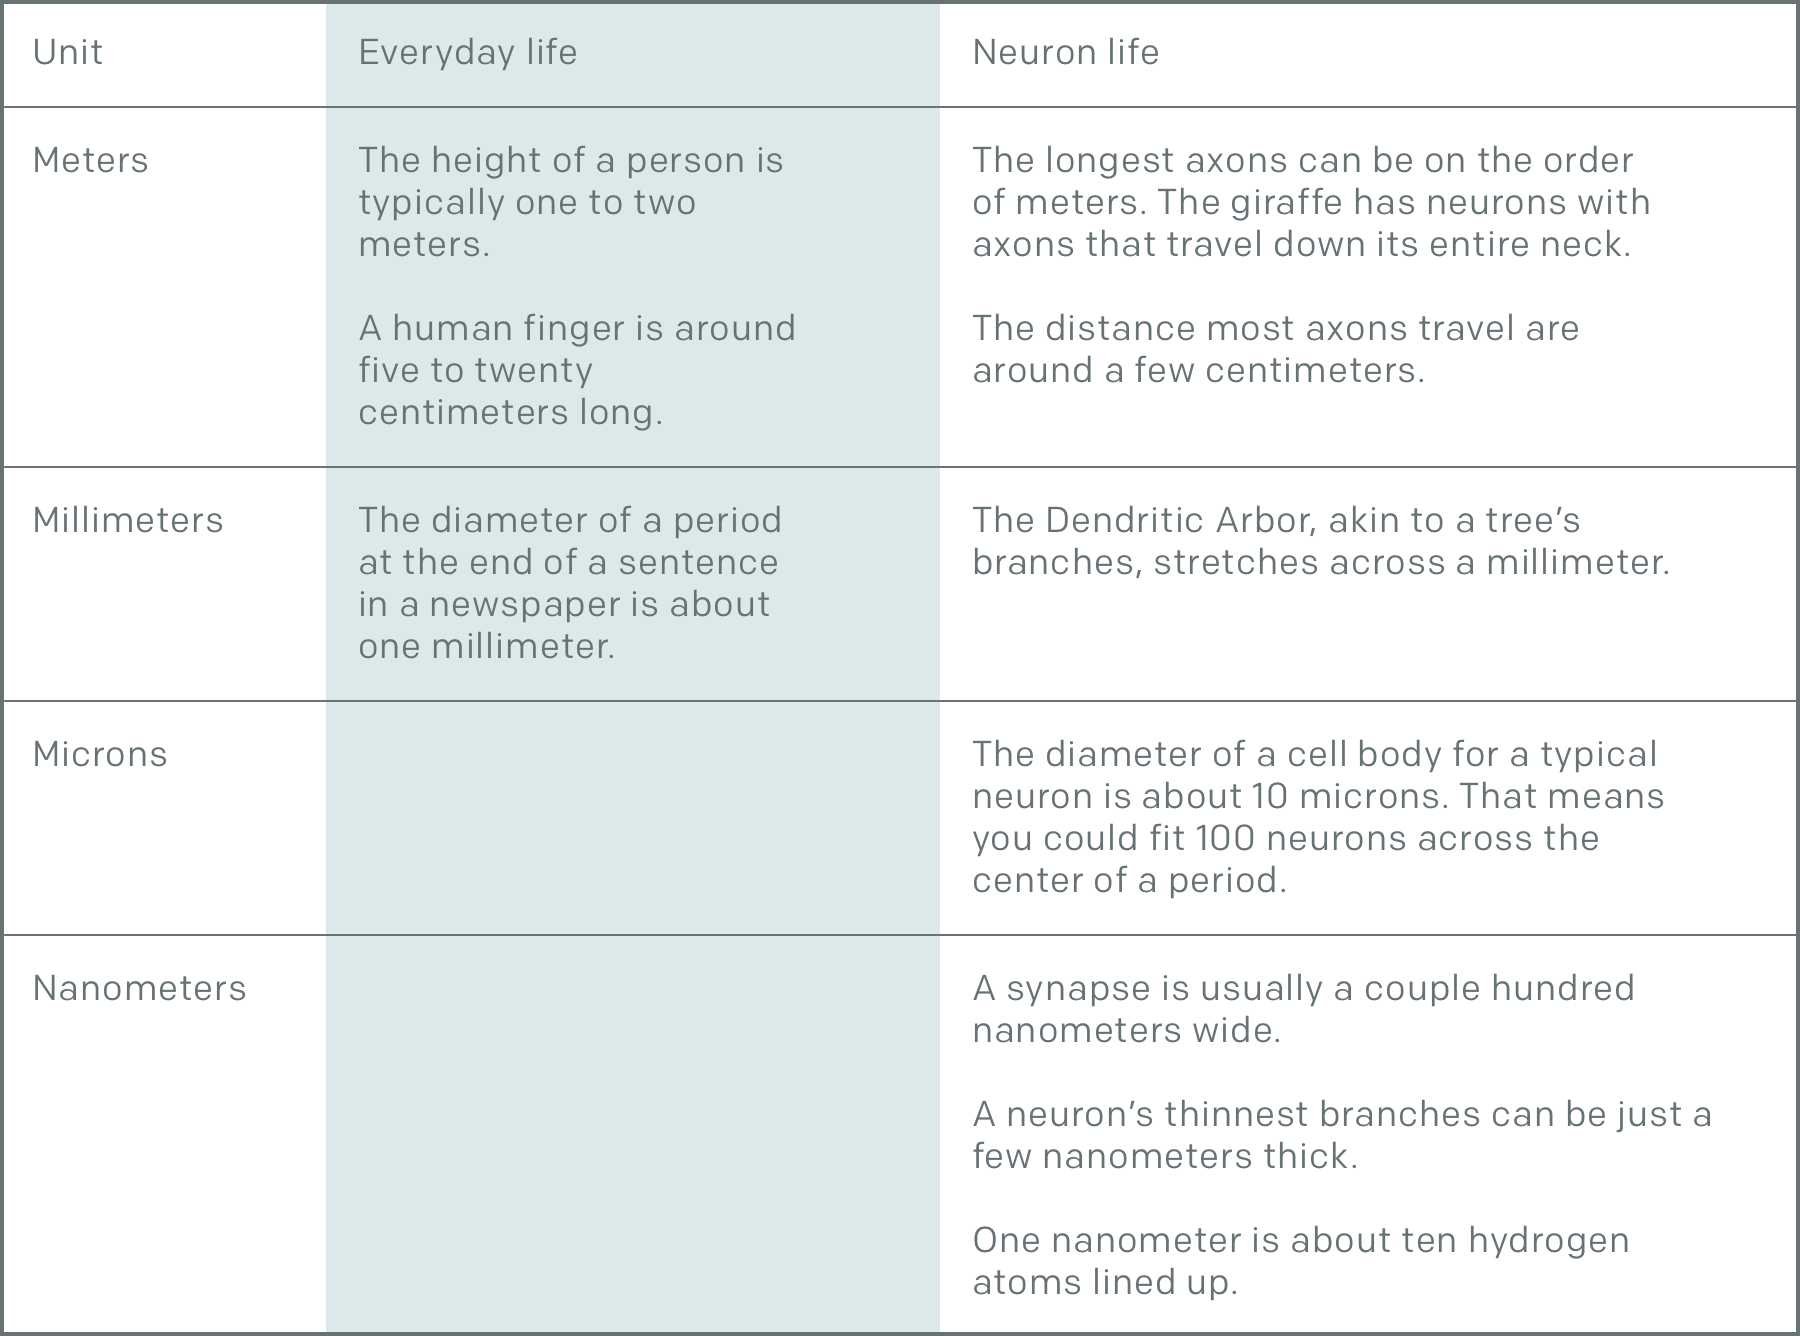
We need the nanoscale to track every branch of a neuron as it wires its way through the brain. Unfortunately, trying to track something at the nanoscale for centimeters to meters is a Herculean task because of the vast difference in scale. Fortunately, many fields of neuroscience are working together to tackle this challenge and there’s a lot of additional information we can see at the nanoscale. There are mitochondria, nuclei, microtubules & microfilaments, endoplasmic reticulum, golgi bodies, vesicles, postsynaptic densities. Also fortunately this task isn’t left to labs alone thanks to the participation of citizen scientists.

